8 Version control with Git
When in RStudio, quickly jump to this page using
r3::open_version_control().
Session objectives:
- Learn about “formal” version control and its importance.
- Learn about Git for version control and apply RStudio’s integrated Git tools.
- Learn and apply the basic workflow of Git version control: View changes to files, record and save those changes to a history, and synchronize those changes to an online repository (GitHub).
- Use GitHub to collaborate with others on a project.
8.1 What is version control?
Take 5 min and read through this section.
This session is more text and reading heavy compared to other sessions. This is mostly because this topic requires a paradigm shift in how you view files, and requires you to change your habits of how you normally work. While you may get more short-term use out of the R portion of this course, knowing and using version control concepts and tools will fundamentally change how you work over the long term. While the concepts are quite difficult, the tools to use the concepts aren’t, and using them often will make the concepts easier to understand.
](images/phd-comics-version-control.png)
Figure 8.1: ‘Final’ version of a document, using a common and simple ‘version control system’. Image source: PhD Comics
](images/informal-version-control.gif)
Figure 8.2: Filenaming used for the common ‘version control’. Image source: PhD Comics
Does this way of saving files and keeping track of versions look familiar? While the above images are teasing a bit, there is truth to it: it is the most commonly used “version control”.
This form of version control, while common, is fairly primitive, informal, and very manual. It isn’t ideal because it requires making multiple copies of the same file, even if changes are made to only one small part of the file. This approach also makes it difficult to find specific changes.
There are, however, formal version control systems that automatically manage changes to a file or files.
These formal version control systems take snapshots of changes done to files, which are usually called “revisions” or “commits”. These “commits” record what was changed since the previous “commit”. When you make these “commits”, you have to create a short message on what or why you made a change. These “commits” are stored as a log entry in a history. This history then has all this information, for each commit, on what file or files were changed, what was changed within the file(s), who changed it, and the short message about the change. This is extremely useful, especially when working in teams, or for yourself 6 months in the future (because you will forget things), since you can go back and quickly see what happened and why.
To understand how incredibly powerful version control is, think about these questions (or refer to the comic above!):
- How many files of different versions of a manuscript or thesis do you have laying around after getting feedback from your supervisor or co-authors?
- Have you ever wanted to experiment with your code or your manuscript and need to make a new file so that the original is not modified?
- Have you ever deleted something and wish you hadn’t?
- Have you ever forgotten what you were doing on a project, or why you chose a particular strategy?
All these problems can fixed by using formal version control! There are so many good reasons to use version control, especially in science:
- Transparency of work done (to demonstrate or substantiate your scientific claim)
- Claim to first discovery (you have a time-stamped history of your work)
- Defend against fraud (because of the transparency)
- Evidence of contributions and work (who does what is tracked)
- Easily keep track of changes to files (by looking at the history of changes)
- Easy collaboration (because you can work on a single file/folder rather than emailing versions around)
- Organized files and folders (one single project folder and one single file, rather than multiple)
- Less time findings things (because everything is organized)
In this session we’ll be covering a version control tool called Git. While Git on its own can be quite difficult to use, RStudio thankfully has an amazing and straight-forward integration to it.
8.2 What is Git?
Take 5 min and read through this section.
Git is one of several version control system tools available. It was developed to help software programmers to develop and manage their work on Linux (an operating system like Mac or Windows). Sadly, it was designed by and for software programmers and not for non-programmer users (like us!). So why do we teach it? Because there are so many great features of Git that fit with how science and data analysis is done!
- Like R, it is open source, so it’s free and anyone can check that the code is correct
- It is very popular and so has a very large online community that provides support, documentation, and tutorials on how to use it
- The vast majority of open source work, like developing R packages,
is done using Git and is hosted on GitHub,
which is a company that hosts Git “repositories” (i.e. projects) online
- All RStudio code and tidyverse packages are on GitHub
- There are many open scientific projects that use Git and are hosted on GitHub, e.g. rOpenSci organization, MRC Integrated Epidemiology Unit
- RStudio has an amazing interface and integration with Git
While learning Git and version control can be difficult and has a steep learning curve, like learning R, it is ultimately an investment into your future productivity and effectiveness as a researcher. It is very much worth it to learn and use it as often as you can.
8.3 Basics of Git
Take 5 min and read through this section.
How Git works is by tracking changes to files at the project level
(i.e. for every R Project).
So you won’t track your entire, for instance, My Documents/ folder.
When file changes are saved and put into the history,
this history is called a “repository” (also called a “repo” for short).
We’ll explain more about what a repository is later.
For every project we need to set up
and associate a Git repository with the project folder.
Before you continue,
go into your LearningR R Project
and do a quick check to make sure that everyone has Git properly set up.
Run this function in your RStudio Console
r3::check_git_config()It should run without any error and it should show your email and name. What you do with Git is more or less to:
- Set up Git in your project or folder by starting it as a “repository”
- Tell Git to track a file by preparing it to be saved to the history
- Save changes to files in the history with a message you recorded about the change
Other things you can do with Git:
- Check what’s been changed or added in files since the last save
- Check the history for what was previously changed or added
When working with GitHub, there are extra things you can do (more on this later):
- Synchronize the Git repository on your computer with the repository on your GitHub, called “push” (upload) and “pull” (download).
So first off, what exactly is the Git repository?
The Git repository works at the project (the folder) level
because it stores the version history in the hidden .git/ folder.
In Windows, this folder will probably not be hidden,
but in Mac and Linux,
files and folders that start with . are automatically hidden.
The .git/ folder itself is the repository used by Git
to store the file changes and history of the project.
So don’t delete it!
Another important file for managing the repository is the .gitignore file.
This file tells Git to not track (or “watch”) certain files,
such as personal data files or temporary files.
LearningR
├── .git/ <-- Git repository stored here
├── R/
├── data/
├── doc/
├── .gitignore <-- Tells Git which files NOT to save
├── LearningR.Rproj
└── README.md
Setting up a Git repository can be done in several ways:
- When starting a new R Project, the “Create a git repository” option can be selected from the “New Projects” setup instructions.
- For existing R Projects, you can type in the console
usethis::use_git().
When creating the project from prodigenr, Git is automatically set up.
8.4 Using Git in RStudio
Git was initially created to use in the terminal (i.e command-line). However, because RStudio has a very nice interface for working with Git, we’ll be using that interface so we don’t have to switch to another application. While the terminal provides full access to Git’s power and features, the vast majority of daily use can be done through RStudio’s interface.
To access the Git interface in RStudio, click the Git icon beside the “Go to” search bar (see Figure 8.3) and then click the “Commit…” option (Ctrl+Alt+M).
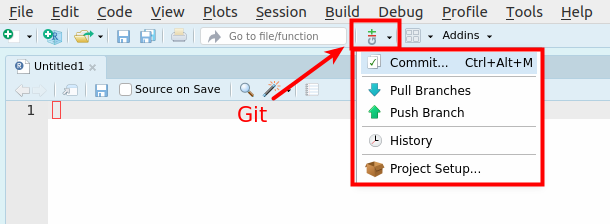
Figure 8.3: The Git button location in RStudio.
The Git interface should look something like Figure 8.4 below. A short written description is given below the image.
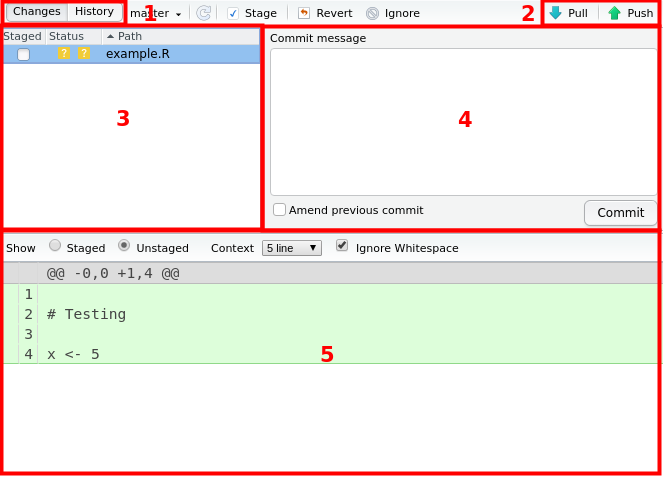
Figure 8.4: The Git interface in RStudio.
- The “Changes” and “History” buttons that allow you to switch between views. Changes is what is currently changed in your files relative to the last history item. History is the record of what was done, to what file, when, and by whom.
- The “Push” and “Pull” buttons are what synchronize with GitHub, which we will cover later in the session.
- The panel that lists the files that have been modified in some way. You add (“stage”) files here that you want to be put into the history.
- The Commit Message box, where you write the message about the changes that will be put into the history.
- The panel that shows what text has been modified, added, or removed from the file selected in panel 3. Green highlight indicates that something has been added, while red indicates a removal. Changes are detected at the line level (what line in the file).
So far, it should show a bunch of files that we’ve added
and used over the previous sessions.
In the Git interface, select the README.md file.
You should see the text in the file, all in green.
Green means the text has been added.
Red, which you will see shortly, means text was removed.
Now click the “Staged” checkbox besides the README.md file
to get it ready to be saved into the history.
You’ve now “added” it to the staged area.
The box on the right side is where you type out your “commit” message.
“Commit” means you save something to the history of changes;
You “commit” it to the history, like you “commit” something to your own memory.
Before we move on, there are some things to know about how Git works. In Git, there are three “states” that a file can be in, listed below and summarized in Figure 8.5.
- The Working folder state is where all files are, whether they are “untracked” or “tracked”. Untracked is when Git sees the file, but it has not yet entered the history. Tracked is when the file has been saved in the history and Git “watches” it for changes.
- The Staged state is when a file has a change that is different compared to the version in the history and it has been checked (“added”) into the “Staged” area (by ticking the checkbox beside the file in the Git interface).
- The History or Committed state is when a “commit” message has been written and the file and its changes has been saved into the repository history.

Figure 8.5: The three states files and folders are in when using Git.
This system allows us to keep a journal (a log) of what has been changed, why it has been changed, who changed it, and when. Figure 8.6 below shows an example log of the history of a previous version of this lesson, which makes it easy to get an overview of what is happening in a project.
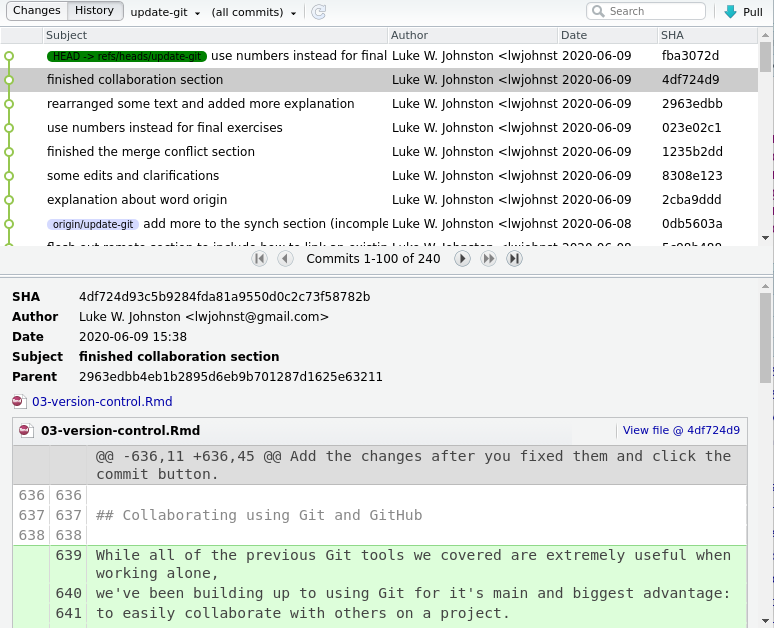
Figure 8.6: An example of a history for this course’s repository.
You may notice that the messages in the log give a bit of detail about why a change was made, though it’s not always the case. Sometimes a message like “minor edit” is enough, because it was a minor edit.
A general tip for writing an effective commit message is that it is concise but meaningful. Writing down meaningful messages can save you a lot of time in the future when you come back to a project after some time and forget what you were doing. With a well written history you can get a quick idea or reminder about the state of the project.
Ok, now write something like “Add initial README file” in the commit message box
and commit the change.
After committing,
you’ll notice that the README.md file is no longer on the left side.
That’s because we’ve put the change into the history.
We can view the history by clicking the “History” button in the top-left corner
of the RStudio Git interface.
Here you can see what has been done in previous commits.
Next, open up the README.md file in RStudio using the Files tab.
At the top of the file, write your name and your field of research,
and then save the file.
Open up the Git interface again (with the Git icon or with Ctrl-Alt-M).
You should now see the added text in green.
Alright, now stage the change (click the checkbox),
write a message like “added my name to README file”,
and commit the change.
Go back to the history and you should see the two commits done in your repository.
If you don’t see it in the history,
you likely need to click the refresh button at the top.
A question that may come up is how often should you commit? In general, it’s better to commit fairly frequently and to commit changes that are related to each other and to the commit message. Following this basic principle will make your history easier for you to read and make it easier for others as well.
8.5 Exercise: Committing to history
Time: 10 min
- Practice the add-commit (“add to staging”-“committing to history”) sequence by adding and
committing each of the remaining files in your R project one by one into the Git history
(e.g. the
.gitignore, the.Rfiles, and the.Rprojfile).- Make sure to write a meaningful and short message about what you added and why. In this case, the “why” is simply that you are saving the file into the history.
- Once all the files have been added and committed,
add a new line to the
R/version-control-session.Rwith an R comment (starts with a#). Type out something like “This will be used for testing out Git”.
8.6 “Remotes”: Storing your repository online
Take 3 min and read through the next two paragraphs.
A version control system that didn’t include a type of external backup
wouldn’t be a very good system,
because if something happened to your computer,
you’d lose your Git repository.
In Git, this “external” backup is called a “remote”
(meaning it is something that is separate from and in a different location,
usually online, than the main repository).
The remote repository is essentially a duplicate copy of the history
(the .git/ folder) of your local repository (on your computer),
so when you synchronize with the remote,
as illustrated in Figure 8.7,
it only copies over the changes made as commits in the history.
One of the biggest reasons why we teach Git is because of the popularity of several Git repository hosting sites. The most popular one is GitHub, with another being GitLab (which this course is hosted on). In this session, we’ll be covering GitHub not only because it is very popular, but also because the R community is almost entirely on GitHub.
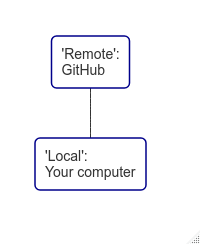
Figure 8.7: The ‘remote’ vs ‘local’ repository, or online vs on your computer.
Ok, we’ll go over this all together now.
Let’s get familiar with GitHub.
First, open up GitHub in a browser,
make sure you are logged in, and create a new,
empty repository.
New repositories can be created by
either clicking the green “New” button on the left sidebar
or by clicking the + symbol at the top right to open a menu
and selecting the “New repository” item.
You’ll be sent to a screen with some options for the new repository.
For now, type out learning-github as a name for the repository,
to match your R project name,
and leave everything else blank.
Make the repository “Private” for now.
The video below can be used as a reference.
A quick side note. When using GitHub, especially in relation to health research, you need to be mindful of what you save into the Git history and what you put up online. Some things to think about are:
- Do not save any personal or sensitive data or files in your Git repository
- Don’t save very large files, like big image files or large datasets
In both cases, it’s better to use another tool to store files like that, rather than through Git and GitHub.
Ok, we now have a remote repository to work with. The next step depends on whether you have an existing repository with a history or you are starting completely from new.
If you haven’t created a Git repository and saved to its history, the easiest way of having your GitHub repository on your computer as a local repository is to download it (or to “clone” it in Git terms).
You can “clone” a GitHub repository easily from RStudio’s “Create Project from Version Control” interface. We’ll do that now, as detailed in the video below. Where you save the new project doesn’t matter, but to make things easy, save it to the Desktop.
For existing repositories, we need to link the GitHub repository to the existing one on your computer. Sadly, there is no RStudio interface (yet) for easily doing this, and it requires us to use the Terminal (found in RStudio).
First, let’s create another new GitHub repository,
but this time call it LearningR to match the name of our existing repository.
So repeat the process as we did above.
Once the GitHub repository has been created,
copy and paste the code as shown in the image below
(Figure 8.8).
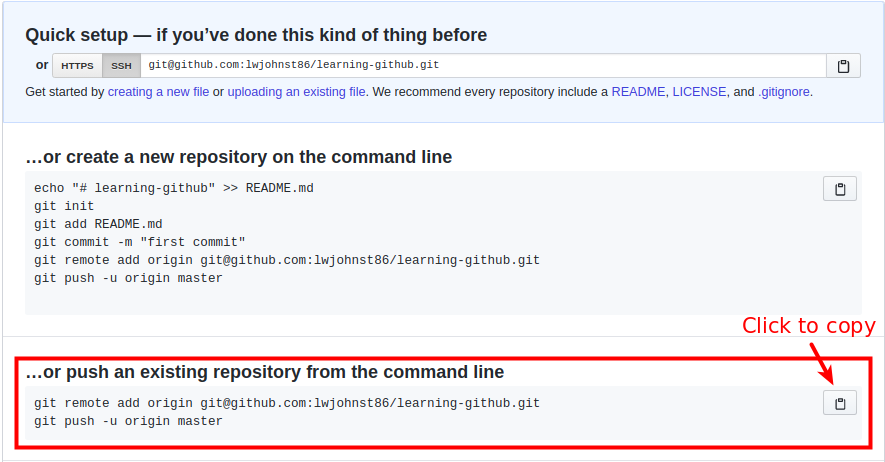
Figure 8.8: Code to copy and paste to link and upload an existing Git repository in GitHub.
One new term here is the word origin when referring to remotes.
The word origin is the default short name to refer to the location of the remote
(the GitHub URL).
It will come up again later on and whenever using remotes, like with GitHub.
Open up the LearningR RStudio R project
and go to the Terminal tab beside the Console tab,
shown in Figure 8.9).
Paste the code into the Terminal by right-clicking and selecting “Paste”
(note: “Ctrl+V” does not work) and press Enter.
You will likely need to type in your GitHub password.
Wait for it to finish and then go to the LearningR GitHub repository.
You should now have your project files on GitHub!

Figure 8.9: Location of Terminal in RStudio.
8.7 Exercise: Clone GitHub repository from RStudio
Time: 5 min
Get some practice with cloning from GitHub by doing it again with another repository.
- Create a new practice GitHub repository (name it
practice-repo), and include a README file as well (see image below). - Create a new RStudio R project of the newly created GitHub repository. Clone it to your desktop.

Figure 8.10: Checkmark to click to add a README to your new repository.
8.8 Synchronizing with GitHub
Take 3 min and read through the next two paragraphs.
Making and cloning a GitHub repository is the first step to linking a local repository to a remote one. After that, to keep your GitHub repository synchronized, you need to “push” (upload) and “pull” (download) any changes you make to the repository on your computer, as demonstrated in Figure 8.11. It isn’t done automatically because Git is designed with having control in mind, so you must do it manually. Pushing is when changes to the history are uploaded to GitHub while pulling is when the history is downloaded from GitHub.
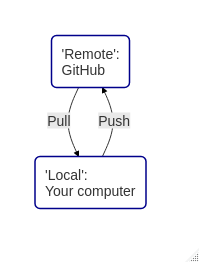
Figure 8.11: Synchronizing with GitHub: ‘Pushing’ and ‘pulling’.
So, when we put the concepts back into the framework of the “states”, first introduced in section 8.3, pushing and pulling happen only to the history. Things that you’ve changed and then saved to the history, either on the remote or the local repository, are synchronized from or to GitHub. So, as shown in Figure 8.12, ‘pushing’ copies the history over to GitHub and ‘pulling’ copies the history from GitHub. Changes saved in the history also reflect the working folder (the files and folders you actually see and interact with), ‘pulling’ also updates the files and folders.
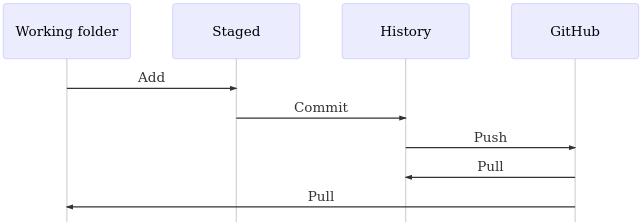
Figure 8.12: Which states get pushed and pulled.
Alright, let’s go over this together and practice the concepts.
Make sure you are in the LearningR R project,
which should tell you in the top right corner, above the Console pane.
If you aren’t, switch to it by clicking the button in the top right corner
and selecting the LearningR project from the menu.
Open up the README.md
and add a random sentence somewhere near the top of the file.
Save, then open the Git interface,
by typing “Ctrl+Alt+M” anywhere in the RStudio interface
(but not when in the Terminal) or going to the “Git button -> Commit”,
and add to the staging and commit the new change.
Next, click the “Push” button in the top right corner of the Git interface
(in box 2 of Figure 8.4).
A pop-up will indicate that it’s pushing and will tell you when it’s done.
Now go to your LearningR GitHub repository.
You should see the new change is also on the GitHub repository.
Click the README.md file on the GitHub website
and then click the “Edit” button
(see the video below, which shows it for the learning-github repository).
Add another random sentence somewhere near the top of the file.
Scroll down to the commit message box, type out a commit message,
and click the “Commit” button.
Go back to RStudio, open the Git interface
and now click the “Pull” button in the top right corner beside the “Push” button.
Wait for it to finish pulling
and check your README.md file for the new change.
You’ve now updated your project.
8.9 Exercise: Push and pull
Time: 10 min
- Using the
practice-repoproject you created in the previous exercise, open up theREADME.mdfile in RStudio. - Add one or two sentences of a simple
and fake description of the project to the
README.mdfile. Add and commit the change. - Push the changes up to GitHub.
- Confirm that the change was synchronized to your GitHub repository.
- In the GitHub
practice-reporepository, directly edit yourREADME.mdfile there. Commit the changes. - Open up your RStudio
practice-repoproject and pull the changes you made on GitHub.
8.10 Dealing with file conflicts between the local and remote
Normally Git is very good at synchronizing and merging changes between a local repository and its remote repository. However, sometimes, when it encounters a problem it doesn’t know how to fix, it stops merging the two histories and lets you manually fix the problem. This is called a “merge conflict” and it is when one or more files have changes that conflict with one another.
An example would be when you make a change to some code on your work computer, then on another day are working on the code on your home computer and make a slightly different edit to the same code. Normally, if you keep your repository synchronized, this wouldn’t be a problem. But sometimes you forget to synchronize, so when you do, Git may detect a conflict on the same lines in a file between the histories of the local and remote repositories. At this point, Git stops and gives you control to resolve it.
Let’s force a conflict to happen.
In your LearningR RStudio R project,
open up the Git interface
and make sure that you don’t see R/version-control-session.R anywhere in the list
and that you’ve pushed and pulled already with your GitHub repository.
Then, open up R/version-control-session.R
and add the text # Here's an example of a conflict to the very first line.
In the Git interface, add and commit this change
but don’t push the changes!
Then, go to your GitHub repository
and open up the version-control-session.R file in the R/ folder.
Click the “Edit” button, as you learned previously in the session.
In the first line of the file,
add the text # When a conflict happens.
Write a simple commit message and commit the change.
Now, go back to your RStudio project, open the Git interface and click “Pull”. You can try to push first, but when there are differences between your local and remote repository, Git will prevent you from pushing to GitHub until you first pull. Once you pull, Git will detect if a file conflict exists and halt it’s “merging” process.
You should see something like the below text (may be slightly different):
<<<<<<< HEAD
# Here's an example of a conflict
=======
# When a conflict happens
>>>>>>> origin/master
The text on the top between <<<<<<< HEAD
and ======= are the changes found on your local repository.
The text on the bottom between =======
and >>>>>>> origin/master are the changes found on your remote
(GitHub) repository.
HEAD is the term to mean where your files are currently at.
Think of HEAD as meaning the “top” of the history.
origin/master indicates that the commit comes from the master branch
of the origin remote.
The concept and use of branches is a powerful feature of Git,
but due to time we won’t be covering them.
You only need to know that every Git repository starts with the default
master branch.
At this point,
you decide what to keep
and what to remove by deleting text within the version-control-session.R script in RStudio.
You’ll need to also delete the lines with the <<<<<<< HEAD,
=======, and >>>>>>> origin/master
After deciding what to keep and removing all the left over merge conflict tags, open up the Git interface in RStudio. The files listed in the staging area will show the conflict file with a yellow/orange “U”. When you’ve dealt with the conflict, you can click the file to be staged, which will change the colour to blue. Next you commit the changes in the Git interface, without writing a commit message (this is not necessary when resolving merge conflicts) Push the changes to GitHub, then open up the Git repository in GitHub, refresh the browser, and view that the changes have taken place.
8.11 Exercise: Dealing with merge conflicts
Time: 10 min
- In your GitHub
practice-reporepository, edit theREADME.mdfile by replacing one word with a random word (e.g. “blahblah”). Commit the change. - Go to your RStudio
practice-repoproject and, without pulling from GitHub, replace the same word you did on the GitHub version of theREADME.mdfile, but instead use a different random word (e.g. “ticktock” instead of “blahblah” from above). Add to the staging and commit the change with RStudio’s Git interface. - Using RStudio’s Git interface, pull the changes from GitHub. There should be a warning about merge conflicts. Now you can practice dealing with and fixing merge conflicts. Add the changes to the staging after you fixed them and click the commit button (you don’t need to type out a commit message).
- Push the changes up to GitHub and view them there to make sure they have been synchronized (you may need to refresh the browser).
8.12 Collaborating using Git and GitHub
While all of the previous Git tools we covered are extremely useful when working alone, we’ve been building up to using Git for it’s main and biggest advantage: to easily collaborate with others on a project.
Using the concept and structure of remote repositories like GitHub, combined with the idea of saving changes to files in a history, collaborating with others on a common project is much easier and more powerful. Think of it like Dropbox on steroids.
Let’s go back to the concept of remote repositories. Since a local repository is simply a copy of a remote repository, anyone else can collaborate on your project by copying the remote repository. When they want to contribute back, they make commits to their local copy and push up to the remote. Then you can pull to your local copy and do the same thing. This is illustrated in Figure 8.13.
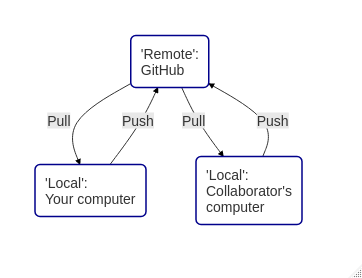
Figure 8.13: Collaborating with others using Git and Github by having a shared central GitHub repository.
For public GitHub repositories, anyone can copy your repository and contribute back, so working with collaborators is easy. When you have a private repository, you need to explicitly add collaborators in GitHub.
You add someone by going to “Settings -> Manage Access -> Invite a collaborator” (also shown in the video below).
We won’t have you do this for this session, since you’ve all been added as collaborators to your group’s repository. But you will get practice collaborating on a Git project in the final exercise.
8.13 Summary of session
- Use the version control system Git to track changes to your files, to more easily manage your project and to more easily collaborate with others.
- Git tracks files in three states: “Working directory”, “Staged”, and “History”.
- The Git repository contains the history.
- The main actions to move between states are:
- “Add to staging”
- “Commit to history”
- When committing to history, keep messages short and meaningful. Focus more on why the change was made, not what.
- “Remotes” are external storage locations for your Git repository.
GitHub is a popular remote Git repository hosting service.
- Downloading a Git repository from GitHub is called “cloning”.
- “Pushing” and “pulling” are actions to upload and download to the remote repository (usually given the name “origin”).
- When there are differences in changes to the same lines in a file,
a merge conflict occurs that you must deal with manually.
- Decide on which text to keep between the tags:
<<<<<<< HEAD,=======, and>>>>>>> origin/master(the last name may sometimes look different).
- Decide on which text to keep between the tags:
- Almost all Git actions can be done using RStudio’s Git interface.
8.14 Final exercise: Group work
Time: 30 min
For this exercise, you as a group will upload your group project folder to GitHub. We’ve already created a team repository for you (which you should already have access to). From this point on you’ll use Git and GitHub to collaborate on your project.
- During the project management session’s final exercise on the first day,
you designated a “coordinator” in your group.
For this task,
the coordinator needs to link their project to the team’s GitHub repository
and upload (push) their project files to GitHub.
- Use the process we did for an existing repository.
- After the coordinator has done this,
each team member must “clone” (download)
the updated project using RStudio’s interface
(“File -> New Project -> Version Control -> Git”).
- Use the process we did for new repositories.
- Then each team member needs to move any files they worked on in their old project folder
and move them into the newly created Git repository R project.
Then add to the staging, commit, and push those file changes to GitHub.
- You’ll likely have to deal with Merge Conflicts at this point. We’ll be here to help out.
- Then complete item 5 and its sub-tasks in the group assignment
(to jump quickly to the assignment,
run
r3::open_assignment()in the RStudio Console).